Standalone, self-contained TUI tool that lets users control and monitor their Home Assistant smart home setup through customizable terminal dashboards.
Live streaming is no longer available due to power and connectivity issues.
Instead, check this out: HAtui Demo Website
Want to try it yourself? The demo website provides test credentials for a hosted Home Assistant instance where you can experience HAtui's interface and functionality with virtual switches and some sensors (no lights sadly).
Note: While the test environment lets you explore some of of HAtui's features, the real magic happens when you connect it to your own Home Assistant setup with actual smart devices!
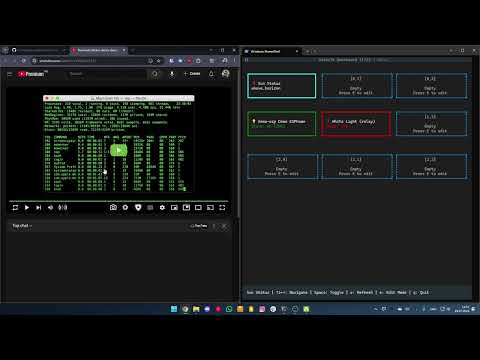
Check out this video demo showcasing HAtui's features and capabilities in a real Home Assistant environment:
- Multi-Dashboard Support: Create and manage multiple custom dashboards
- Real-time Control: Toggle lights, adjust brightness, monitor sensors
- Keyboard Navigation: Full keyboard-driven interface
- Entity Management: Add, remove, and rename entities in edit mode
- Dashboard Management: Create, delete, rename, and reorder dashboards
- Brightness Staging: Smooth brightness control with staging to prevent API flooding
- Auto-Configuration: Creates default config on first run
- Clone and run:
git clone https://github.com/CristianEduardMihai/HAtui.git

cd HAtui
python3 run.py  # python if you're on Windows
That's it! The runner script will automatically:
- Detect your operating system
- Create a virtual environment
- Install all dependencies
- Launch HAtui
For a more permanent installation with a convenient hatui command:
- Clone and install:
git clone https://github.com/CristianEduardMihai/HAtui.git

cd HAtui
python3 install.py  # python if you're on Windows
This installer will:
- Run the setup process (same as
run.py) - Add a convenient
hatuicommand to your shell
After installation, simply run:
hatui❗❗IMPORTANT: Do not move or rename the HAtui folder after installation! The shell alias points to the specific installation location.
Before first use, set up your Home Assistant connection:
# Copy the example and edit with your details
cp example.env .env


# Edit .env with your Home Assistant URL and token

# HA_URL=http://your-ha-instance:8123

# HA_TOKEN=your_long_lived_access_token
Pre-built binaries are available in the Releases section:
- Windows:
hatui-windows.exe - Linux:
hatui-linux - macOS:
hatui-macos
Download the appropriate binary for your platform, set up the .env file, and run!
- Arrow Keys (↑↓←→): Navigate entities
- Space: Toggle entity (lights, switches, etc.)
- Ctrl+↑↓: Adjust brightness (for lights)
- Ctrl+←→: Switch between dashboards
- r: Refresh entities
- q: Quit
- e: Enter edit mode
- a: Add new entity
- Delete: Remove entity
- Enter: Pick/Drop entity (move entities)
- n: Edit entity name
- d: Dashboard management
- Escape: Exit edit mode
- Ctrl+N: Create new dashboard
- F2: Rename dashboard
- Delete: Delete dashboard
- Ctrl+↑↓: Reorder dashboards
- Enter: Switch to dashboard
- Escape: Close manager
- In Home Assistant, go to your Profile (click your username)
- Scroll down to Security section
- Click Long-lived access tokens
- Click Create Token
- Give it a name (e.g., "HAtui")
- Copy the generated token to your
.envfile
HAtui automatically creates a config.yaml file on first run with a sample dashboard. You can:
- Edit this file directly
- Use the built-in dashboard and entity management (press 'e' for edit mode)
- Create multiple dashboards with different entity layouts
current_dashboard: 0

dashboards:
  -  name: "Living Room"
     rows: 3
     cols: 3
     refresh_interval: 5
     entities:
      -  entity: "light.living_room"
         position: [0, 0]
         type: "light"
         display_name: "Main Light"